Plugins
1. Redux Framework
Redux framework is a must required plugin. This plugin will let you customize theme settings.
Theme options:
After you've installed this plugin, you will find theme options at Dashboard > Beehive > Theme options.
2. CMB2
CMB2 is also a must required plugin. It will inject page options so that you can control and override global theme options.
Page options:
After you've installed this plugin, you will find page options underneath the edit page/post screen in the WordPress dasboard.
3. Buddypress
Buddypress is the plugin that makes social interactions happen in the beehive theme. It's a required plugin that must be installed.
Sidebars:
When you install the plugin, the theme automatically adds the following sidebars:
- Buddypress Sidebar: this sidebar is rendered on buddypress pages on the frontend i.e activity page, members page and groups page.
- Member Profile Sidebar: it is rendered on the right side of the member profile page.
- Broup Profile Sidebar: it is rendered on the right side of the group profile page.
You can populate the sidebar at Dashboard > Appearance > Widgets.
Settings:
Buddypress settings can be found at Dashboard > settings > Buddypress.
Buddypress settings include:
- Components: you should keep them all checked.
- Options: here you will find buddypress options.
- Pages: buddypress requires some pages to insert it's contents and work properly. When you activate buddypress, it automatically creates and assign the pages, however, you may assign your own pages here.
For exclusive theme settings, go to Dashboard > Beehive > Options > Buddypress.
xProfile Fields:
You can create profile fields for your users, but to do so, Extended Profile component in the Dashboard > settings > Buddypress must be enabled.
To edit/add/delete profile fields, go to Dashboard > users > Profile Fields
Fields in the base profile group will appear in the register page. Also, you can add profile field group and assign fields to them for your users to fill.
Customizer:
Beehive theme uses the latest buddypress template pack which is called buddypress nouveau. It adds some addional settings to WordPress customizer at Dashboard > Appearance > Customize > BuddyPress Nouveau.
4. RTMedia:
RTMedia adds the missing features like photo, video, audio and albums to the buddypress and together it turns your website into a media rich social network.
Sidebar:
When you install the RTMedia plugin, the theme automatically adds a Media Sidebar to your website. Go to Appearance > Widgets and assign your widgets to it. This sidebar is displayed in media pages such as photos, and videos.
Settings:
Find RTMedia settings at Dashboard > RTMedia > Settings.
For exclusive theme settings, go to Dashboard > Beehive > Options > RTMedia.
5. Buddychat:
Buddychat is an awesome plugin that works based on buddypress and lets website users to chat with each other.
Settings:
Find Buddychat settings at Dashboard > Buddychat.
6. WooCommerce:
WooCommerce adds ecommerce functionality to your website.
Products:
Products: add/edit/delete products at Dashboard > Products. For detailed informationa about managing products, click here.
Products filters:
You can add products filter bar on product archive page. Go to Appearance > Widgets and assign the woocommerce product filter widgets to Shop Filters sidebars
Sidebar:
When you install the wooCommerce plugin, the theme automatically adds a sidebar to your website. This sidebar is called Shop Sidebar and it is displayed in all wooCommerce pages.
Ajax Search:
If you want ajax product search in your shop, just install and activate the Ajax Search for WooCommerce plugin. You don't have to do anything else. The search form in the shop filters bar will be pulling search result through ajax.
Orders:
To manage the orders, go to Dashboard > WooCommerce > OrdersMore infomation on managing orders can be found here.
Settings:
For settings, go to Dashboard > WooCommerce > Settings. Find more information about configuring settings, click here.
For exclusive theme settings, go to Dashboard > Beehive > Options > WooCommerce.
Customizer:
Go to Dashboard > Appearance > Customizer > WooCommerce for wooCommerce cutomizer settings.
7. BuddyCommerce:
Buddypress and WooCommerce are different plugin and they both have seperate user panels for users. BuddyCommerce moves WooCommerce user panel to buddypress profile tabs so your users can perform WooCommerce my account actions right in their buddypress profile.
Settings:
Find BuddyCommerce settings at Dashboard > Settings > BuddyCommerce.
8. WP Job Manager:
WP Job manager plugin will add job-board like functionality to your WordPress theme. It is a shortcode based plugin and easy to setup and manage. To use a shortcode, you will need to simply create a page and paste the shortcode into the page.
Shortcodes:
The following shortcodes are available to you:
- [jobs]: this shortcode displays all the jobs in a page. Click here for shortcode attributes.
- [submit_job_form]: it displays job submit form by which your users submit jobs. Click here for shortcode attributes.
- [job_dashboard]: this shortcode renders manage job screen in a page. Click here for shortcode attributes.
- [job-category-listings]: this shortcode displays jobs categories. Available attributes are show(top/all), columns(number i.e. 3), show_count(bool i.e 0/1), and child_count(number i.e. 5. To use it show must be selected to all).
All the pages with these shortcodes are imported during theme installtion.
Sidebar:
The theme automatically creates "Jobs Sidebar" after you install the plugin. The sidebar is rendered in all job related pages.
Settings:
Find job manager settings at Dashboard > Job Listings > Settings.
For exclusive theme settings, go to Dashboard > Beehive > Options > Job manager.
9. Beehive Job Categories:
This plugin requires wp job manager plugin to work. It creates a shortcode that displays job category list.
Shortcodes:
- [beehive_wpjm_categories]: this shortcode displays jobs categories. Available attributes are show(top/all), columns(number i.e. 3), show_count(bool i.e 0/1), and child_count(number i.e. 5. To use it show must be selected to all).
10. WP Adverts:
WPAdverts is a light weight plugin which allows you to classifieds site in minutes. It's a shortcode based plugin and easy to use.
Shortcodes:
The following shortcodes are available to you:
- [adverts_list]: shortcode for displaying all list of active adverts. Click here for shortcode attributes.
- [adverts_add]: Usually you will want to allow your visitors to post ads, without accessing wp-admin panel, you can do so using [adverts_add] shortcode. Click here for shortcode attributes.
- [adverts_manage]: Management Panel is a place where users (other than adminstrator) can edit, view and delete ads they previously posted. This shortcode renders the management panel. Click here for shortcode attributes.
- [adverts_categories]: Displays list of Advert Categories in a grid. The categories can be displayed in two modes. Either just the most top categories or categories and sub categories underneath. Click here for shortcode attributes.
Sidebar:
The theme automatically creates "Classified Sidebar" after you install the plugin. The sidebar is rendered in all classified related pages.
Settings:
To find the classifieds settings, go to Dashboard > Classifieds > options.
For exclusive theme settings, go to Dashboard > Beehive > Options > Classifieds.
PayPal Payments Standard (addon):
This module allows to accept PayPal payments for posting ads from customers. It will work with any PayPal account type, but it is best to use Premier or Business account, only with this accounts, payments can be automatically accepted and processed.
Find the addon in download package (beehive-package) inside the plugins folder. To activate it, navigate to Dashboard > Plugins > add new, upload, install and activate like any other plugin.
Once the addon is activated, you can go into Module settings panel (Dashboard > Classified > Options > PayPal Standard > Settings) which will look pretty similar to the one on screenshot below:
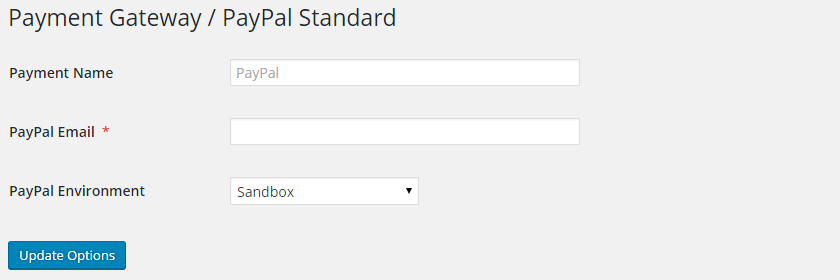
The module have only few configuration fields:
- Payment Name: this is payment gateway name that will be visible to users when they will want to pay for posting Ad.
- PayPal Email: your PayPal email.
- PayPal Email: almost always you will want to use “Production (real money)”, the second option “Sandbox” is for debugging and testing PayPal integration. If you would like to use the Sandbox you will need go to https://developer.paypal.com/, login with your account details and create test accounts there.
Also, enable the Payments module at Dashboard > Classified > Options > Payments. Configure settings:
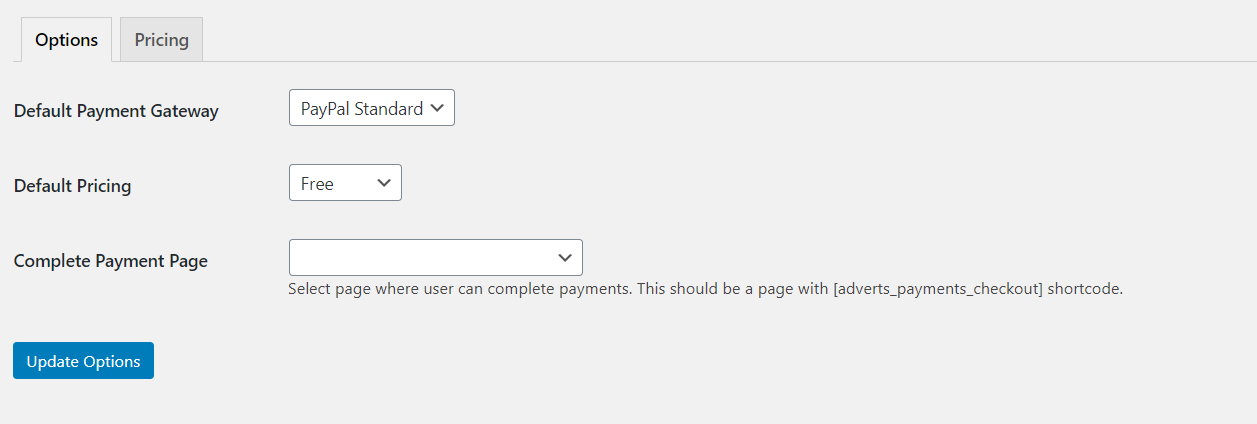
- Default Payment Gateway: select the default payment gateway which should be PayPal Standard.
- Default Pricing: select the default pricing. Click on the pricing tab menu to create/manage pricing models.
- Complete Payment Page: create a page and insert the
[adverts_payments_checkout]shortcode in it. Come back to here and select the page from the dropdown.
When configured and enabled, your site visitors will be able to select this payment method in third step when posting an Ad.
11. Learnpress:
Learnpress is a learning management system. This is one of the best WordPress LMS Plugins can be used to easily create & sell courses online.
Sidebar:
The theme automatically creates "Courses Sidebar" after you install the plugin. The sidebar is rendered in all course related pages.
Menu:
The theme automatically creates "Course Menu" after you install the plugin. This course menu is rendered on course archive page and become a teacher page.
Settings:
To find the learnpress settings, go to Dashboard > Learnpress > settings.
For detailed documentation, please https://docspress.thimpress.com/learnpress/ their website. Yoy may also want to watch their video, explaining each part of the plugin: https://www.youtube.com/watch?v=3LDa8vtDIAk
11. bbPress:
bbPress plugin creates forums in your WordPress set up. The plugin is very light and easy to setup.
Sidebar:
The theme automatically creates "Forum Sidebar" after you install the plugin. The sidebar is rendered in all forum related pages.
Settings:
To find the forums settings, go to Dashboard > Settings > bbPress.
For exclusive theme settings, go to Dashboard > Beehive > Options > bbPress.
12. Elementor:
This plugin is a beauty. It is the most advanced and most used page builder ever created in WordPress platform. Building a page has never been so easy. Elementor offers limitless design possibilites in your finger tips. It comes with lot of free widgets that can be used to create a page. The builder is very user-friendly and lets you edit the page live.
Elementor offers a pro version which is not required to use the theme. You can install the free version from the WordPress repo. All the additional design widgets used in this theme are available right after you install the plugin and theme.
However, you may check out there pro version. They offer tons offers for very small amount.
If you have any question regarding this plugin, go to their website which has a very rich reasources for beginners.
Settings:
To find the elementor settings, go to Dashboard > Elementor > Settings.
14. Paid membership pro:
With the paid membership pro plugin, you will be able to sell memberships to your users, and certain features by membership levels.
Menu:
You should assign paid membership pages to "Account Menu (My Account)" at Dashboard > Appearance > Menus.
Settings:
To find the paid membership pro settings, go to Dashboard > Memberships > settings.
For detailed documentation, please visit https://www.paidmembershipspro.com/documentation/ their website. Yoy may also want to watch this video playlist: https://www.youtube.com/watch?v=wTP9kw5o8SQ&list=PLtaXuX0nEZk9DpdAFe14CtzDQlWlaGaE8, explaining each part of the plugin.
Integrations:
The beehive theme currently supports following addons:
- Paid Memberships Pro – BuddyPress Add On: with this addon, you'll be able to restrict certain buddypress features by membership levels. Find the documentation here: https://www.paidmembershipspro.com/add-ons/buddypress-integration/
- Paid Memberships Pro – WooCommerce Add On: with this addon, you'll be able to set discounts on products by membership levels. Find the documentation here: https://www.paidmembershipspro.com/add-ons/pmpro-woocommerce/
- Paid Memberships Pro – bbPress Add On: with this addon, you will be easily able to toggle the membership level(s) that can access the forum. Find the documentation here: https://www.paidmembershipspro.com/add-ons/pmpro-bbpress/
14. Beehive Widgets:
This plugin adds some useful widgets to the theme.
15. Contact Form 7:
This plugin is required to create contact form on your theme. If you have imported demo data, it has already created a contact form in your contact page, however, you need to configure the for at Dashboard > Contact.
Learn about how to configure contact forms at: https://contactform7.com/docs/
16. Buddy Bridge:
This plugin currently adds hashtags into the buddypress activity streams. Users are now able to add hashtags with their activity posts.
The plugin also adds a widget called (Buddy Bridge) Activity Hashtags for displaying popular hashtags. You can assign this widget to any sidebar you want at wp-admin > appearance > widgets.
17. Transcoder:
If you want to create thumbnails automatically from the videos, you can use this plugin. Please contact us to implement the plugin.
17. Social Articles:
With the Social Articles plugin , your users with the "edit-posts" capability will be able to post articles to your blog. Learn more about roles and capabilities here: https://www.wpbeginner.com/beginners-guide/wordpress-user-roles-and-permissions/
Settings:
Find the plugin settings at WP Dashboard > Settings > Social Articles.
Learn more about the plugin here: https://wordpress.org/plugins/social-articles/