Getting Started
General:
If you've succesfully purchased beehive theme, this is the place to start. Here you will find all the infomation about the theme such as installation, importing demo contents, customization etc.
Beehive is a WordPress theme so you need to have a working WordPress set up before you can use the theme.
Download Package:
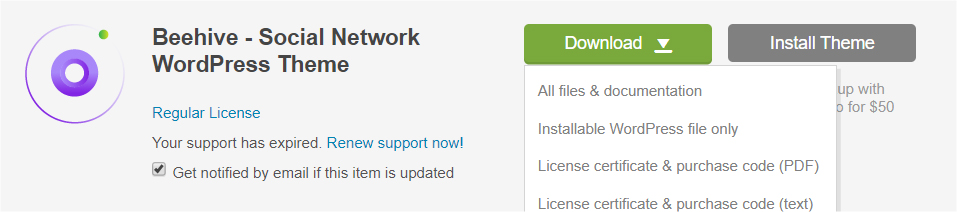
To download the package, follow the steps below:
- Log into your themeforest.net account, navigate to Account >> Downloads and find the beehive theme.
- Click the download button. This will popup some of options to you.
- You will either click All files and documentation or Installable WordPress files only to download the beehive theme.
- For licensing information, click on License certicate and purchase code.
After downloading the All files and documentation, unzip the folder and you'll get the following:
- Installable files
- Documentation
- Licensing
beehive.zip inside the Installable files folder is the main theme file that you will need to install on your WordPress setup.
Requirements:
To use Beehive, please make sure you are running WordPress 4.7 or higher, PHP 5.6 or higher, and MySQL 5.6 or higher (WordPress recommends PHP 7.3 at minimum).
- Check to ensure that your web host has the minimum requirements to run WordPress.
- Always make sure they are running the latest version of WordPress.
- Make sure that your host has PHP memory limit set to 128MB recommended.
- Always create secure passwords for FTP and Database.
WordPress installation:
Before using our beehive theme, you must have a WordPress installed on your web server. You may checkout the WordPress installation instuction in the official WordPress site.
WordPress installation process varies depending on the host you choose. However, most of them provides you with tools to install one with just few clicks
You may also check out this awesome Tutorial by wpbeginner. They have covered most of the host in detail.
Some useful links:
- WordPress Instuctions: general information and installation instuctions by WordPress.
- Installation tutorial: detailed step by step installation tutorial by wpbeginner.
- First Steps with WordPress: beginner topics by WordPress.
- WordPress FAQs: frequently asked questions by WordPress.